Purpose of the Data Fix Table
The data fix table is used to record updates or fixes to asset or network data where the person identifying the issue does not have access, the experience or the training to make the change(s) to the data themselves.
A user with the appropriate permissions, training and experience can then review the data fix request, make the necessary changes to the database, and then close out the data fix request.
Examples of what can be recorded in this table include (not a complete list):
- The network centreline not following the real alignment
- The network centreline starts/stops in the wrong location
- Changes in the network definition not recorded in the right location (e.g. the change from sealed to unsealed network)
- An asset is missing from the database (standing onsite looking at a bridge for example where the database doesn’t have an asset recorded)
- The asset recorded at the location no longer exists (a bridge may have been washed out in a storm event for example)
- Some part of the data for the asset is incorrect (a bridge may be recorded as a single lane beam and slab bridge, for example, but is in fact two lanes wide)
This How To covers adding and completing/removing a data fix record.
Adding a Data Fix record
Make sure that the Data Fix Request layer is on map – it’s been included in the map layer packages that have been shared for the various reviews.


Select the Data Fix Request table to add the new item to.
Select point or line depending on which is appropriate (for example, a data fix request to split a carriageway at an intersection is fine as a point, while identifying a new road to add to the database needs to be loaded as a line).
Use LINE for the network for anything that requires an extension to an existing road, addition of a completely new road, or change in alignment of an existing road.
For anything else, use POINT, and record the changes in the brief description of the issue field.
For line records, the accuracy of the line needs to be enough to understand what needs to be done – if there are other roads that may confuse matters, the line should be done with enough attention to detail to make sure that it’s clear which road we need to map the fix to.
On the other hand, where it is clear what needs to be done (such as a missing road where the aerials are clear for example), the centreline can be loaded as a rough guide.
Example of “rough” capture for a linear data fix:
The screenshot shows a road for “rough” capture – for clarity’s sake I’m using open street maps rather than aerial imagery but the idea remains the same – 12km long, it’s too long to want to have to carefully map out the centreline for the full distance:
Instead, we speed it up a bit by only mapping out a few points (in this case the full 12km road with only 10 points in total) to give a rough guide as to where the road runs from and to:

Assigning the data fix to a road and entering the necessary data:
Once the data fix point or line has been created (double click the last point when drawing a line to finish it), click Next to move to the road select screen.
Select the road it should be attached to – the metre value behind the road name is the offset from the centreline of the road in question and is an indication of how close your starting point is to the road. Generally, the road to attach the record to should have the lowest offset (with one exception at intersections where you may actually be closer to the centreline of the other road – in this case you’d pick the road it should be on rather than the closest road).
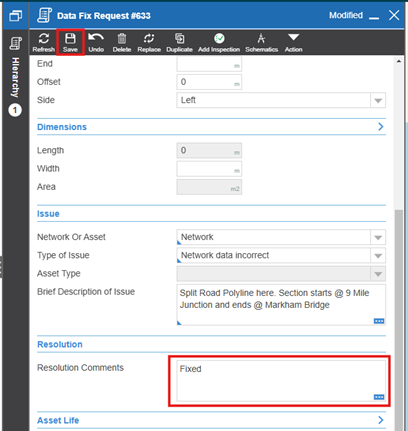
Clicking on the road to use will automatically take you to the record, with the location data filled out based on your choice. Once the form loads, you only need to update the “Issue” section of the form:
Field | Option | What’s required |
Network or Asset | Lookup | Whether the issue is network or asset-based |
| Network | Use this for centreline or carriageway issues (such as a change from sealed to unsealed network in the wrong location) |
| Asset | Use this for a specific type of asset such as a bridge or river crossing |
Type of Issue | Lookup | The first three options should be used if Asset is chosen, the last 3 for network issues only |
| New Asset | [Asset] There should be an asset at this point, but it currently does not exist in the database. |
| Remove Asset | [Asset] There is an asset in the database that no longer exists – either the data was wrong to start with or the asset no longer exists. |
| Data Incorrect or Missing | [Asset] Some piece of data on the asset record is incorrect (type of bridge for example or diameter of the culvert) or is missing completely. |
| Missing Network | [Network] A road is missing from the database completely and should be added. |
| Modify Centreline | [Network] The centreline should be extended (a road runs further than the current centreline shows) or modified (aerials show the road running straight while the centreline has it curving between the two points). |
| Network Data Incorrect | [Network] Some piece of data on the road or carriageway is incorrect (a road is incorrectly labelled as a National District when it should be a National Main for example). |
Asset Type | Lookup | If you select Asset above, this field becomes available to record the specific asset type the issue relates to – some key asset types: |
| Bridge (PNG) | All types of bridges including bailey, concrete, timber, etc. as well as log bridges. |
| Causeway (PNG) | All low-flow structures built to allow crossing of a waterway, whether they include pipes as part of the structure or not. |
| Major Culvert (PNG) | All culverts of 2m2 area or 1.8m in width/diameter or greater. |
| River Crossing (PNG) | Sites where the road exists on both sides of the river where the river can be forded by vehicles to continue along the road (and there is no structure there to support this). |
| Tunnel (PNG) | All bored or cut-and-cover tunnels, along with structures where major culverts have been utilised to allow traffic under another road (an example being the Waigani roundabout using Armco culverts under Poroporena Highway). |
Brief Description | Free text | Required, enter enough information that someone else could make the fix, e.g. for incorrect data “Culvert diameter – should be 600 dia”, or “Update centrelines to match aerial imagery” |
Completing or removing a data fix record
Data fix records are intended to only be temporary, existing in the database until the fix is made, or the request is determined to not be necessary.
Removing the data fix may be done by both the original user who added it as well as the reviewer, while completing the data fix should only be done by the reviewer once they’ve made the necessary fixes requested.
The process to complete or remove a record is very similar with only two steps being different, so the following covers both as a single process.

In the record itself, select the Delete option from the menu.
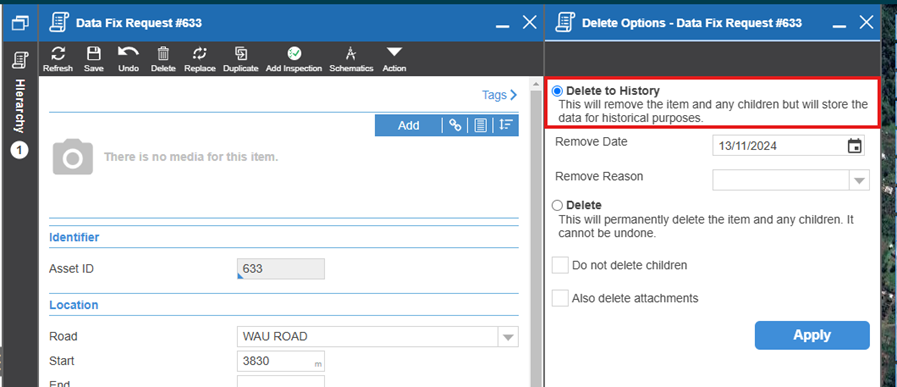
To complete this process, you will need to select a “Remove Reason” – this is the one place that the process differs between completing and removing – if you are completing the data fix request as the issue has been resolved, select “Data Fixed”, otherwise if you are removing the request as it’s either not valid or no longer necessary, select “Removed”, and then click Apply.
The system will then end date the record with the remove date, and once finished, the record will be greyed out with no fields being editable – close the record and return to the map.
If the record doesn’t disappear from the map you can click on the refresh map button in the menu in the top right of the map to refresh the map which will make the record disappear from the map – note only do this while zoomed in on the map, as it refreshes all visible data on the map which may take some time if you’re zoomed out with a lot of data displayed on the map:
Notifications for removed or completed data fixes
As part of the process of resolving these data fix requests, an email is automatically generated and sent out overnight for those records that have been end-dated that day.
The email is sent through to the email associated with the login of the user that raised the original data fix request(s) along with any other users assigned to the same province (as the AWM Mobile tablets are using a fixed user for each province, which may or may not be the same as the actual user making use of the tablet).
The email includes the status of the data fix (removed or data fixed) and the resolution comments for the fix(es).
