
Case Contents

- GoPro Max
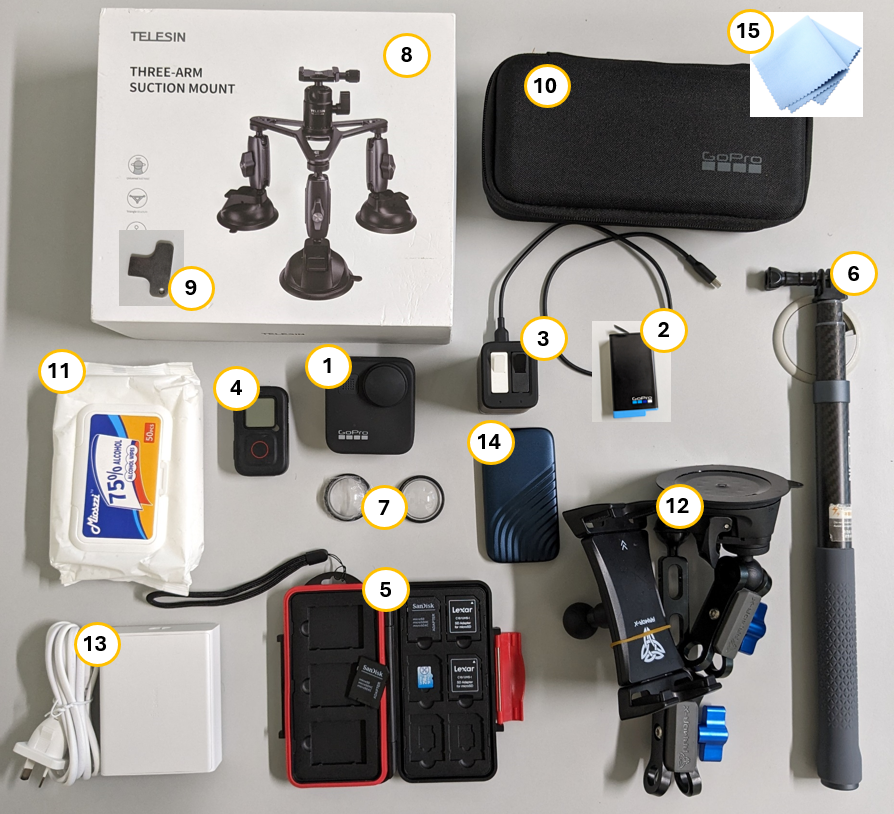
- 2x batteries
- GoPro dual charger
- GoPro Remote (if not using phone)
- SD cards (in case)
- Selfie Stick
- Lens caps
- Suction mount
- Turn key
- GoPro case
- Wet wipes
- Phone holder (if using phone)
- 4-port Belkin charger
- Powerbank
- Cleaning cloth

Vehicle Mount Setup
1. Attach the selfie stick to the tripod
Extent the selfie stick so it is 50-60cm in length.
Attach the bottom of the selfie stick to the central console of the tripod. Use the turning key to tighten.
Make sure the stick is tight and straight.

In some cases, you might also want to use the level mount but in the Department's testing it was established that connecting the stick directly to the tripod is more secure.
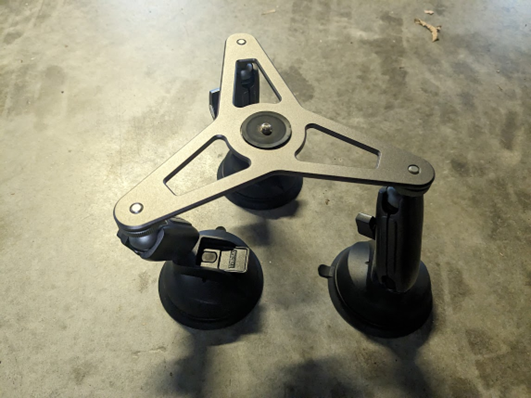
IMPORTANT! Tighten using the turn key to make sure connections are secure.
3. Connect the GoPro
Fold out the connection points from the bottom of the GoPro.

Connect the GoPro to the selfie stick. Insert screw through the fold out connections and tighten.

Remove x2 lens caps and replace with the clear lens caps.


4. Attach tripod to car roof
- Place the tripod in position on top of the vehicle
- Use a wet wipe to clean the area of the vehicle that the suction mounts will be placed on and the suction cups (removing dust).
- Position the arms so that they are spread out evenly and the tripod is level.
- Use the lever to tighten the arms.
- Make sure the Suction Mount clips are raised.
- When in final position, press suction mounts down so there is no gap and then snap clips closed. Do this for each Mount.
- Finally, ensure mounts feel secured.
 |  |  |
5. Adjust tripod on roof
Adjust the angle of the stick to ensure the correct part of the road is being filmed. The screen should be facing the back of the car.


Setting up the In Car Phone or Tablet Holder
 |  |  |
| Connect the three pieces of the phone holder together. | Use the suction cup to connect the holder to the inside of the windscreen. Make sure this is in a position that does not affect the drivers view. | Before pressing record make sure that the setting is on 360 Time Lapse with 0.5s interval. |
GoPro MAX Settings for Recording
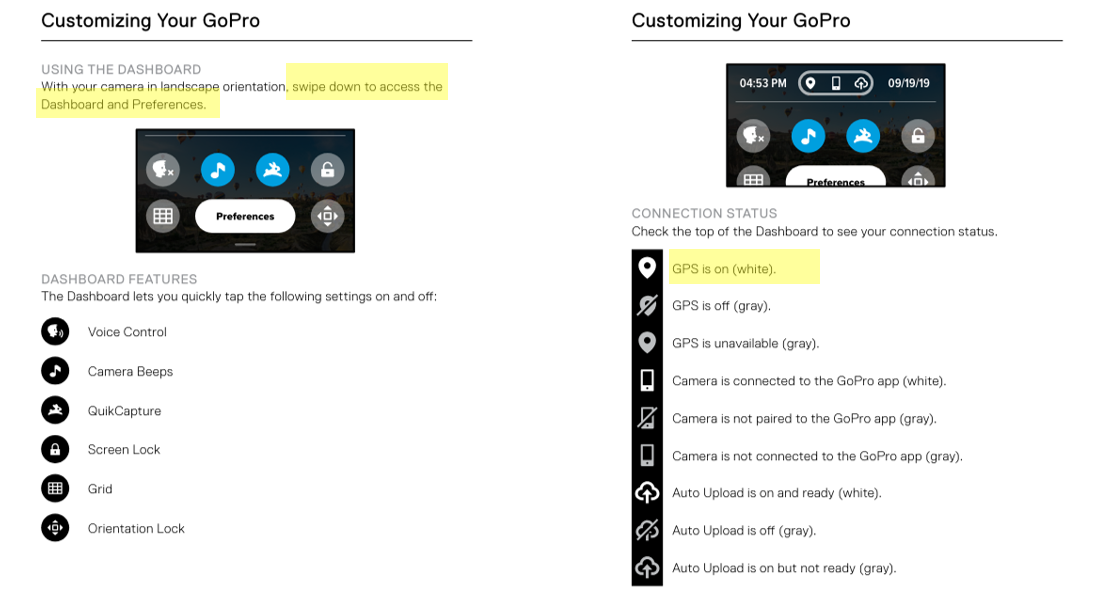
1. Check that GPS is on.
- Go to Preferences -> Regional -> GPS
- Make sure that the GPS icon is bright (not greyed out). To see this view, swipe down to open the dashboard page and then swipe down again to see the date/time and connections, including the GPS symbol.

2. Set to 360 Time Lapse and check settings
- Set the camera to '360' mode by tapping the icon on the bottom left corner. This icon
 should appear.
 - To select time lapse, press the mode button on the side of camera until the clock icon
 and the 360 Time Lapse appears.
 - To edit Time Lapse settings, tap the middle bottom of the screen which will either say 360 Time Lapse or 360 Timewarp. Select 360 Time Lapse.
- Then select the
 icon, scroll down to see the Interval option and select 0.5s
 should appear.
 and the 360 Time Lapse appears.
 icon, scroll down to see the Interval option and select 0.5s
Before pressing record, make sure that the setting is on 360 Time Lapse with 0.5s interval.


3. Check battery and time available to record
- The time in top left of screen indicates how much time is available to record footage. For example, this camera has 2 hours and 11 minutes. You should make sure this is greater than the amount of time you expect to record for that day.
- The battery symbol in top right indicates how much battery is left (same as your phone!) Make sure you have the spare battery and ability to charge batteries if doing a lot of recording.

4. Test Recording
- Use the record button and film a short recording.
- Follow instructions below to check the recording has worked.
- Delete this test recording.

Using the GoPro Quik App
NOTE! It is recommended to use the phone app as it has better functionality than the Remote.
 |  |  |  |  |
| Download the GoPro Quik app. Open app and select the Connect a GoPro button. | Select MAX. | Follow these instructions to allow your GoPro to be connected. Keep the name given to the GoPro. | Once connected you should see this screen. You can operate settings from this screen and start/end recordings. | You can see the view from the GoPro by selecting the Enable Preview button. This requires the WiFi on your phone to be on. When you start recording you cannot see the preview. |
IMPORTANT! Do not press record while in Preview mode because you cannot properly see the battery status (%) from this mode.
NOTE! When using preview, it uses the WiFi from the GoPro device, so it doesn’t use your data.
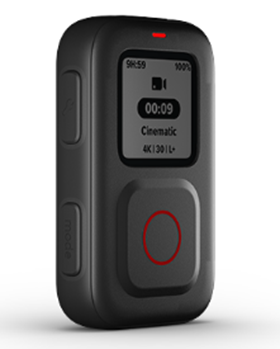
Using the GoPro Remote
NOTE! You can either use the Remote or the phone app but you cannot connect both at once.
Pair the Remote
First time pairing to a camera
- Power off the Remote.
- On your camera, complete these steps to power on the camera.
- Tap Preferences -> Connections -> Connect Device -> Remote
- Power on the Remote.
- Pair New will appear on the Remote's screen. Press the [Shutter Button] to start pairing.
- The camera will indicate successful pairing, followed by an indication on the Remote.
- When successfully paired, the Remote LCD displays the camera settings.

Next time you turn on the Remote it will automatically attempt to connect to the GoPro.
Using the Remote
For taking network video, you should only need to use the remote to start/stop recording using the Shutter Button and to check battery life and memory on SD Card.

General maintenance
Here are some more tips to get the best performance from your camera:
- Always use the black lens cap to protect the lenses when you're not using your camera. The lenses are exposed to capture spherical content and are unprotected. Scratches to the lenses are not covered under the warranty.
- Use the clear Protective Lenses if you want added lens protection when you're using your camera. NOTICE: The clear lenses may affect image quality under certain conditions.
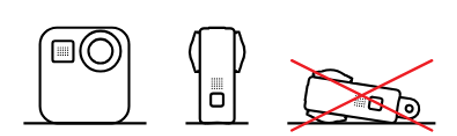
- To protect the lenses from damage, do not rest your camera on its front or back side. Be sure the lenses are not resting against any surface.
- To clean the lenses, wipe them with a soft, lint-free cloth. If debris gets stuck between the lens and the trim ring, flush it out with water or air. Do not insert foreign objects around the lenses.
- Your camera is waterproof to 16ft (5m) so no housing is needed. Be sure the door is closed before using the camera around water, dirt, or sand.
- Before closing the door, be sure the seal is free of debris. Use a cloth to clean the seal if needed.
- Before opening the doors, be sure that your camera is clean and dry. Rinse your camera with fresh water and dry it with a cloth if needed.
- If sand or debris hardens around the doors, soak your camera in warm tap water for 15 minutes and then rinse thoroughly to remove the debris. Make sure your camera is dry before opening the doors.
- For best audio performance, shake your camera or blow on the mics to remove water and debris from the microphone holes. Do not use compressed air to blow into the mic holes. This could damage the internal waterproof membranes.
- After every use in salt water, rinse your camera with fresh water, and dry with a soft cloth.

GoPro MAX basics
Link to GoPro MAX online manual


How to change the SD Card and Battery
Unlock the door, slide it down, and flip it open.

With your camera off, insert the SD card into the card slot with the label facing the battery compartment.

You can eject the card by pressing it into the slot with your fingernail. Insert the battery.

Slide the door all the way up until there's no gap, and then lock it.

NOTICE: Push from the bottom to make sure that the door is closed correctly. Don't use the lock to slide the door closed.
Playing Back Your Media
Recording Process
Map out your day of driving
- It is useful to have some target locations to stop and change batteries/SD Card, and to have a target destination for the end of your day (especially if you plan to stay overnight!).
Recording
- Press the record button on the remote or app to start recording before you start driving.


- When you stop, stop the recording.
- If you are stopping for a long time, turn off the GoPro to conserve battery.
- Before you start driving again, press record. Make sure there is no more than 5 to 10 metre gap between recordings.
Using the Log Form
- There is a Log Form provided in the tough-case. Every time you start/stop, use this to record the date & time and a location (if you have latitude/longitude locations this is the best way to record location).
- Also use the Log Form to record where there is a road that is supposed to be logged but is not accessible for any reason. Provide the reason why the road is not accessible.
Instructions for Driving
Speed Limit
- Should not exceed 70km/h.
- If you go faster than this speed the quality of the image will degrade and the gap between the images increases too much.
Charging batteries
- Using the 360 time lapse mode, a fully charged battery should last 2.5 hours.
- The other battery should be being charged using the power bank and dual charger while capturing footage. Alternatively, can charge using the cigarette lighter adapter.
Check battery and space on SD Card
- You can use the Remote and App to check the status of the battery and the space left on SD Card while you are recording.
- Make sure to proactively change battery/SD card as required. You don’t want to drive for miles accidentally without recording!!
Recording two-lane and four-lane roads
- For two-lane roads (one lane for each direction) only take recording for one direction.
- For four-lane roads (two-lanes in each direction), take a recording for both directions.
Time of day
- Try to avoid taking footage early in the morning or late in the afternoon when the sun is low. Ideally, footage should be taken between 9am to 4pm.
End of the Day Tasks
Charge batteries
- Use the dual charger and Belkin four-port charger to charge the GoPro batteries and the powerbank (if necessary).
Secure gear
- Make sure the gear is in a secure place and padlocked.
Clean gear
- In some cases, the gear might get dirty so please clean as needed, so that footage is clear.
Communicate with POM team and office
- If you have any issues with the gear let the POM team know.
- If you are going out for multiple days/overnight you should check in with your local office to let them know your progress.
Create a folder for each date of data on the external hard drive.

Use a USB SD Card holder or SD Card holder to access the files on the SD Card. Select the files for one date and copy and paste into the folder you created with the same date.

Open Mapillary. Select the files you want to upload either by dragging and dropping into Mapillary or using the browse function.


In Mapillary you will see the PREPARING FOR UPLOAD loading icon.
Once it is ready for upload you will see the GPS track on the map and the name of the video file on the left. If you are happy with the preview, press the Upload button.

